
2GR-FE SW20 Shopping List

Looking to figure out how much your 2GR-FE swap into your SW20 MR2 will cost, here’s a shopping list that will get you most of the way there.
Note that prices are not included here because prices of some of these parts do change over time and also change depending on where you may live. In the USA you can expect the total to be around $6,000USD
OEM Toyota Parts:
The engine itself, this can be from any year of the 2GR-FE but it has to be a 2GR-FE, not a 2GR-FXE,2GR-FSE or any of the others. The 1GR-FE will also not fit.
MR2 clutch/pressure plate of your choice, needs to support at least 300lb*ft of torque. I'm a fan of the TM1-HDG6 ceramic from ACT but there's practically a religion around clutch brands. Pick one you like and supports 300lb*ft or more. Also note that my suggested part number is only for the E153, if you are using the S54 you need to get an appropriate clutch for that transmission.
Internally regulated 2gr-fe alternator (video with more info here)
Hardware to bolt flywheel to engine, pressure plate to flywheel (links on flywheel page)
Hardware to mount trans to the engine
1991-1992 E153 trans hardware:
2x M12x1.25mm 55mm1x M12x1.25mm 70mm
1x M10x1.25mm 35mm
1993+ E153 hardware:
3x M12x1.25mm 55mm1x M12x1.25mm 70mm
3x M10x1.25mm 35mm
1991-1992 S54 Trans hardware:
1x M12x1.25mm 55mm
1x M12x1.25mm 70mm
1x M10x1.25mm 35mm
Frankenstein Motorworks Parts:
Frankenstein Motorworks right side axle carrier bracket (Note, this is only needed if you’re using the E153 transmission, not the S54 transmission)
Frankenstein Motorworks Shift cable spherical bearings if your rubber bushings are worn out
Tach calibration and fix if yours has issues. (video explanation here)
Frankenstein Motorworks flywheel (note: stock 1mz/3vz unit can also work)
TCS Motorsports Parts:
Wilhelm Raceworks Parts:
Wilhelm Raceworks waterneck (don't forget new gaskets from Toyota PN# 16341-AD010 since Alex does not ship new gaskets with his part)
Misc Parts:
MAF sensor 22204-28010 or 22204-0V010 (Ebay is usually a good source for these)
6" air filter, i recommend the AEM 21-209EDK
Serpentine belt (61.5" with A/C, 57.8" without, stock pulleys are 7 rib but 7 rib belts can be hard to find, a 6 rib belt will work just fine)
3-Pin Coolant temperature sensor if appropriate for wiring harness 89422-16010 or Ac Delco 19322820
Recommended, Optional Bits:
Optional but recommended, the "Number 1 or 2" upper intake manifold, see Alex's Blog for explanation
Upgraded rear VVT-I oil line if yours is rubber, Toyota Part Number 15772-31030
Upgraded oil cooler lines if you have an oil cooler with rubber lines: 04004-29131
Electrical:
For the electrical there are four choices available to everyone based on your available skill, time and money.
The easiest “i don’t want to touch it” option. Contact Paul Woods and just ask for a plug and play harness. He’ll walk you through the options for your situation: Paul@woodsport.org
If you decide to go with one of the other couple plug and play wiring suppliers out there, make sure you ask these questions:
Do you use glue lined heat shrink over the joints to seal out the elements (regular heat shrink is not designed for use out in the elements of an engine bay)
Will the harness come with the appropriate connectors to plug directly into your car or will it involve zip-ties, tape and user installed crimps to connect some of the wires.
Will you be able to pull out the engine with the wiring harness without having to completely pull out the wiring out of the car, some people end up attaching the DBW wires without a connector to the engine harness so removal for service can be very tricky.
The easiest DIY route using the 3rd gen Sienna ECU. Note that not all the instructions are available on a pin by pin basis yet, i will get to these as i can.
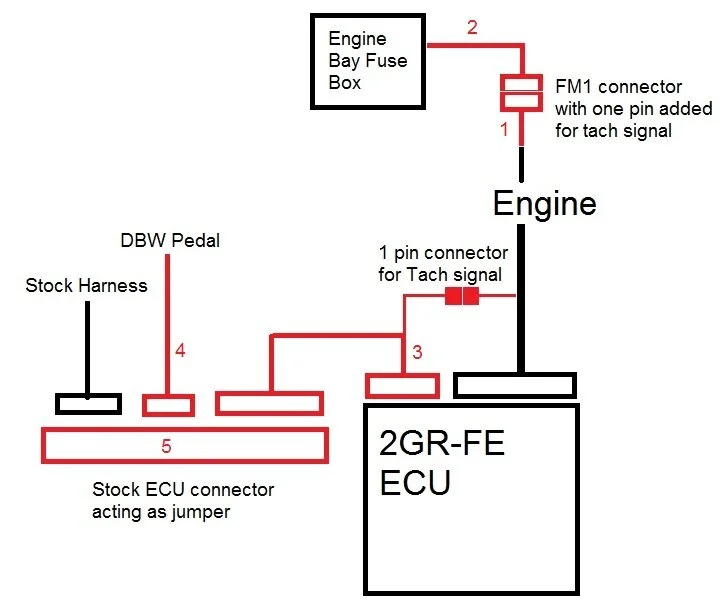
Get the Frankenstein Motorworks FM1 pigtail kit and make the #2 part in this diagram. Note that this also needs to include your speed sensor on the ‘93+ and the reverse sensor as well as the starter solenoid wiring.
Get a 3rd gen Sienna engine wiring harness and convert it to engine swap use with this video with this accompanying documentation This is #1 in the diagram
Get the Frankenstein Motorworks small ECU pigtail kit and wire it into one of the large ECU plug from the stock engine harness. This is #3 in the diagram. Don’t forget to have the single pin going to the main harness for the tachometer signal since the tachometer signal is in the engine bay fuse box of the MR2.
Get the Frankenstein Motorworks DBW pigtail and make a small harness with 6 wires that goes from the pedal to the small stock ECU connector. This is #4 in the diagram.
Get the stock ECU connector (you will have to salvage it from your stock ECU) and make the jumper indicated by #5 in the diagram
Alternatively, you can just modify your stock sienna harness using the FM1 kit above and ask Paul Woods to make the adapter harness. This may be a better option for those that don’t want to ship anything to Paul and are able to do simple wiring work.
A more pin-by-pin wiring video with accompanying documentation is planned in the future but it isn’t available yet.
The fully documented DIY route using the RAV4 ECU. This method used to be the easiest and still is except that the rav4 wiring harnesses are getting exceedingly difficult to find
Get the Frankenstein Motorworks tuned 2009 and earlier RAV4 ECU (no longer available directly but you may contact me for a special order)
Get the Frankenstein Motorworks DBW pigtail and make a small harness with 6 wires that goes from the pedal to the small stock ECU connector. This is #4 in the diagram.
Get the stock ECU connector (no longer available)
Follow the directions given in this video. Note that the video is just an overview and the documentation is linked in the description of the video.
Also, there’s a really good overview available in video form. The playlist can be found here: